Intro
过去一段时间,如果尝试过用claude-code 官方的skills-creator构建agent skills,大概率会发现:agent自己构建的skills往往不好用。于是乎,为了验证一个新写的 Skill 是否真正有效,不得不陷入无止境的“修改 Prompt -> 手动跑测试 -> 检查结果” 的循环中。
直到几天前, 看到了 Anthropic 官方发布的关于 skill-creator 重大更新的文档,给出了一套更加系统、正规和工程化的解法。
简单来说,新版的 skill-creator 已经不再是一个单纯的 SKILL.md 模板生成,而成了一套包含**“skill 草稿 → 评测 → 迭代”** 的完整工作流。
借着这次更新,尝试拆解一下如何用更系统化的方式来做 Skill 的评估与优化。
TL;DR 新版的核心是用 Agent 来评估和优化 Agent,通过多角色分工实现了类似持续集成(CI)的自动化测试闭环
新版本 SKill-Creator 总览
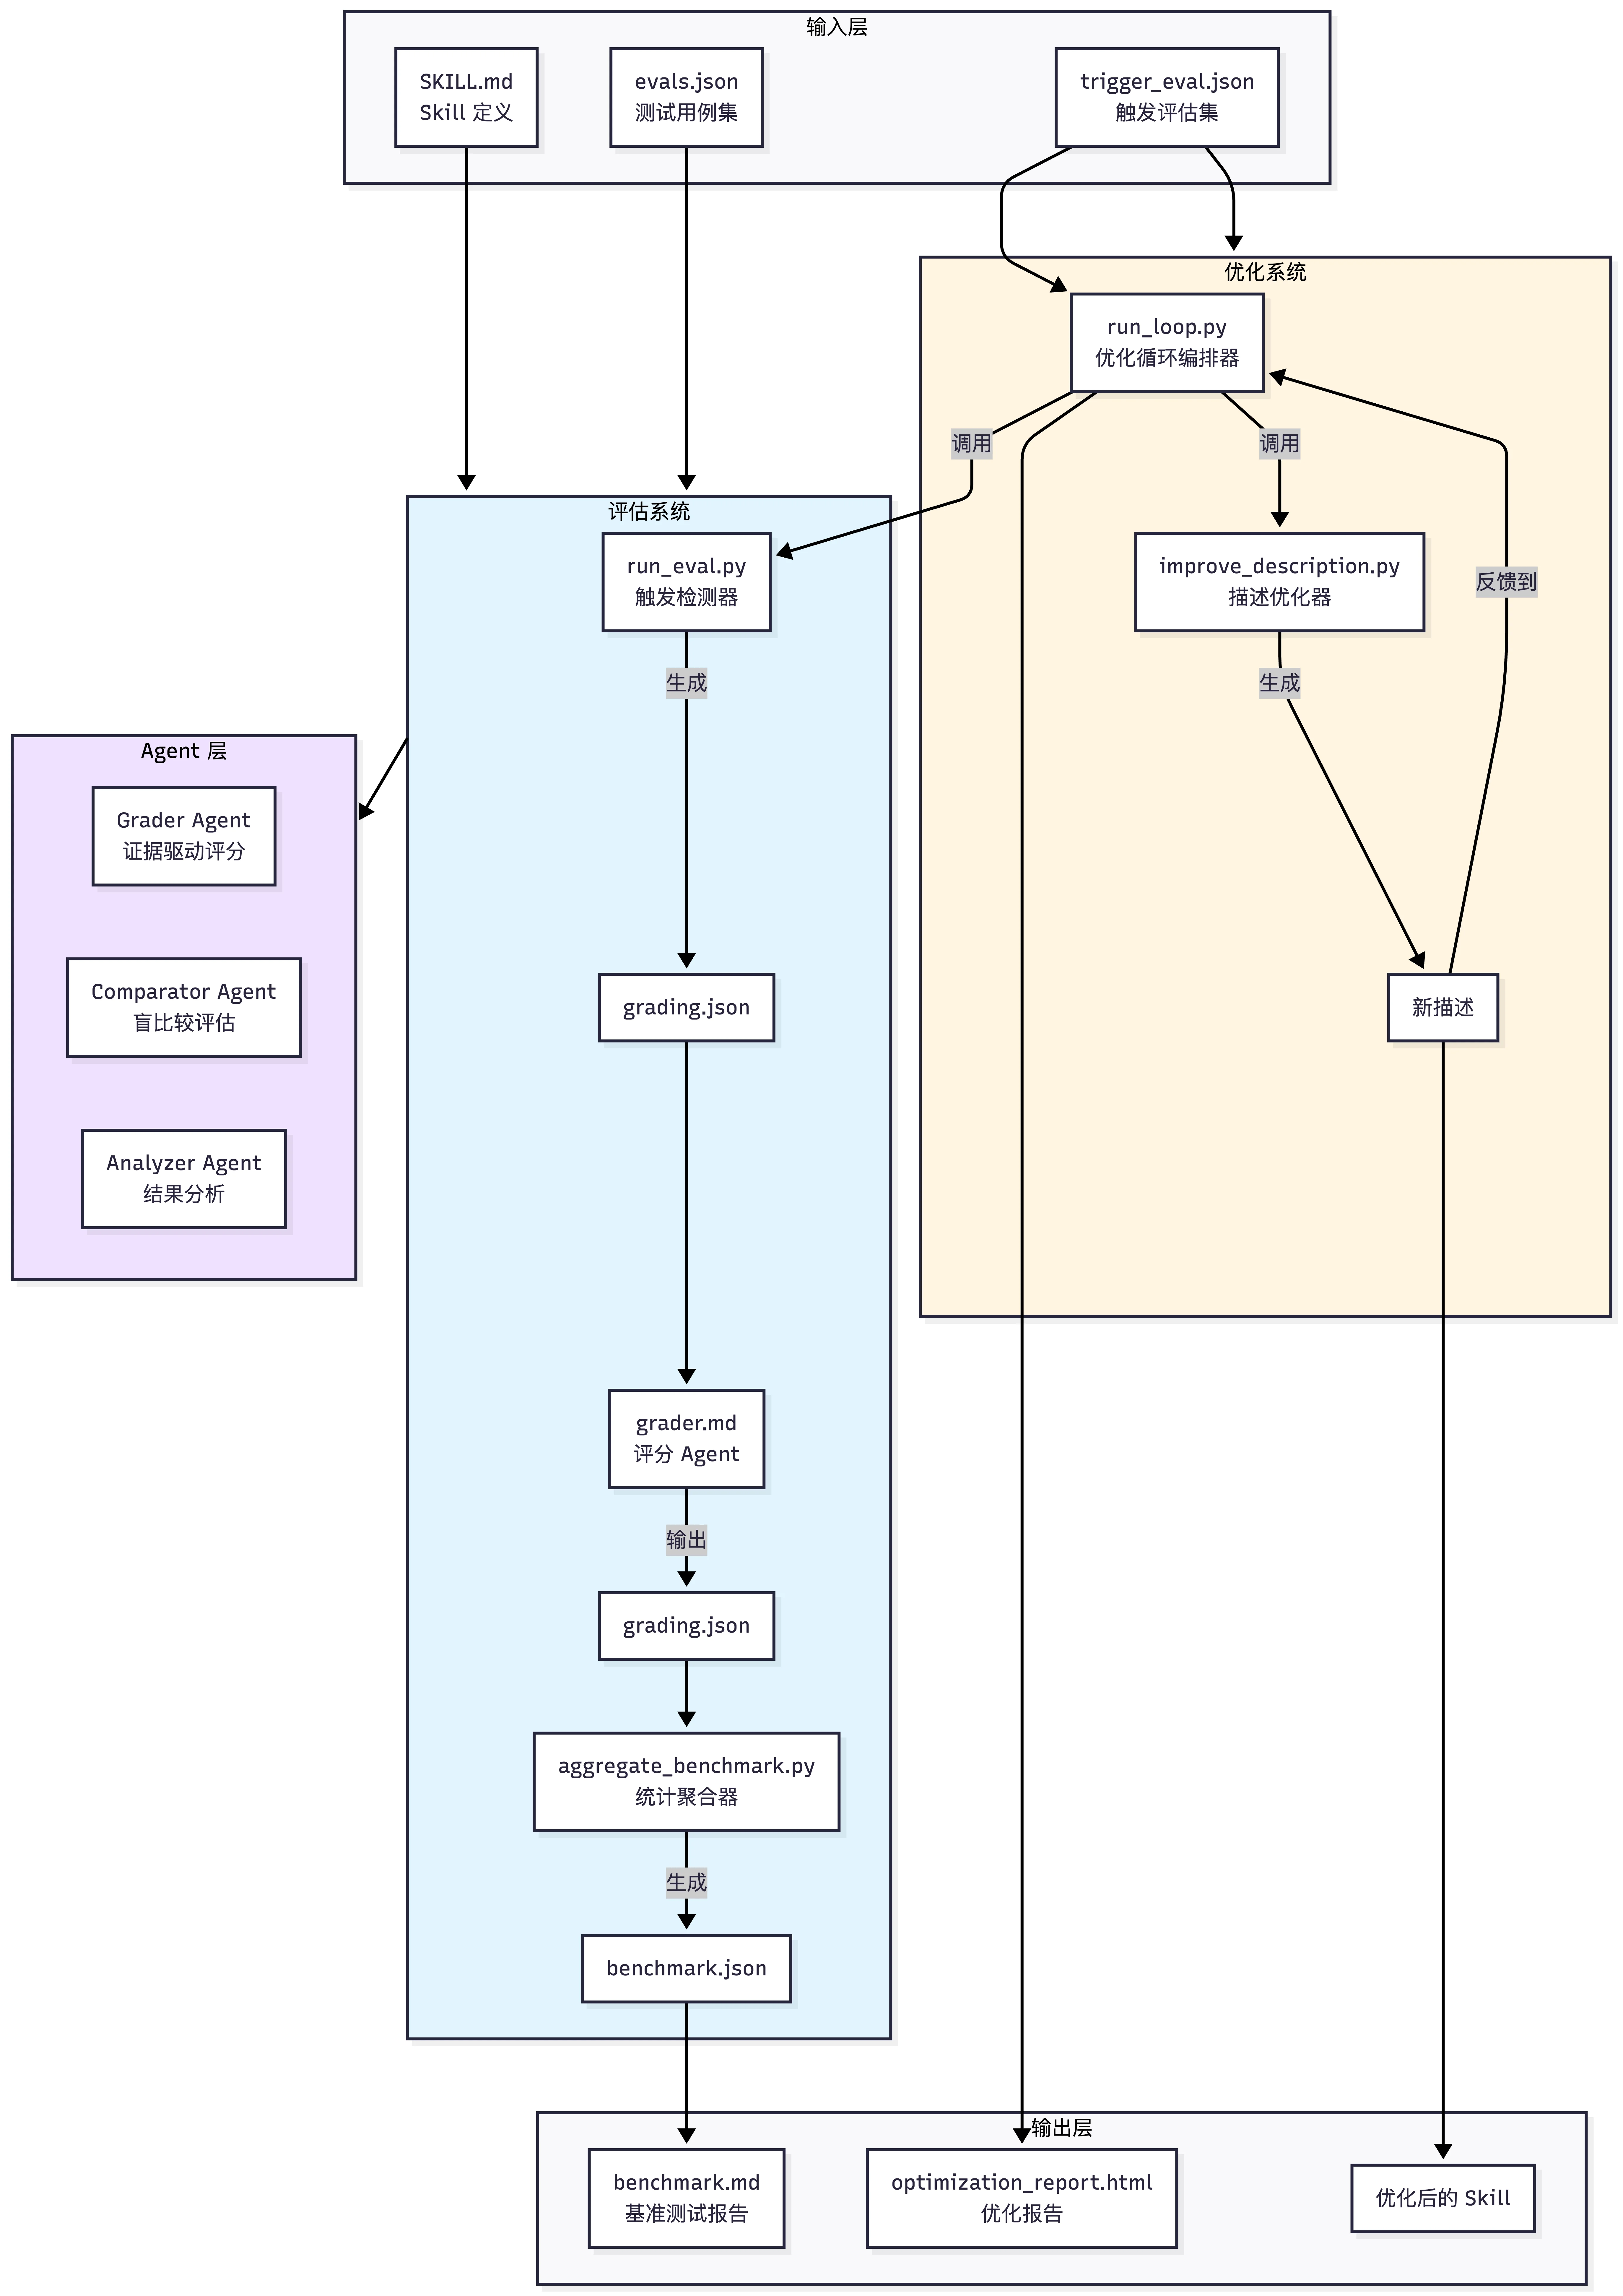
除去原先版本就具备的Skills模版生成,新版Skill-creator 可以理解成由两个相互协作的核心子系统组成:
-
评估系统
-
优化系统
其中评估 包含两个维度:
-
触发评估 (Trigger Evaluation):测试 Skill 的
description是否能在正确的查询下被激活,避免“误触发”或“该触发时不触发” -
功能评估 (Functional Evaluation):基于断言(Assertion)测试输出质量,验证 Skill 执行任务的正确性、完整性和专业度
而优化部分,负责根据评估结果进行自动化或半自动化的改进:
-
description 优化:自动迭代优化Skills的描述,直至触发率达到预期
-
功能优化: 半自动化,引导用户根据评分反馈和 Analyzer Agent 的改进建议,重写 Skill body 中的指令
为了保证评估的客观性,采用多个subagent 隔离上下文实现进行评测
-
Executor: 在隔离环境中并行运行任务,生成执行记录(transcript.md)和输出文件
-
Grader:依据预设的断言,从执行记录中寻找证据,判定 PASS/FAIL 并输出
grading.json -
Comparator/Analyzer:通过 A/B 盲测对比版本优劣,并分析胜出原因,提供可操作的改进建议
评估指标体系
触发评估指标
当评估 skill 描述的触发准确性时,使用以下指标:
| 指标 | 计算公式 | 含义 |
|---|---|---|
| True Positive (TP) | 应该触发且确实触发的次数 | 正确的触发 |
| False Positive (FP) | 不应触发但却触发的次数 | 错误的触发 |
| True Negative (TN) | 不应触发且确实没触发的次数 | 正确的不触发 |
| False Negative (FN) | 应该触发但没触发的次数 | 遗漏的触发 |
| Precision | TP / (TP + FP) | 触发时的准确率 |
| Recall | TP / (TP + FN) | 召回率(覆盖率) |
| Accuracy | (TP + TN) / (TP + TN + FP + FN) | 总体准确率 |
| Trigger Rate | (TP + FP) / Total Runs | 实际触发的比例 |
计算示例(run_loop.py lines 154-167):
def print_eval_stats(label, results, elapsed):
    pos = [r for r in results if r["should_trigger"]]
    neg = [r for r in results if not r["should_trigger"]]

    # 计算 TP, FN
    tp = sum(r["triggers"] for r in pos)
    pos_runs = sum(r["runs"] for r in pos)
    fn = pos_runs - tp

    # 计算 FP, TN
    fp = sum(r["triggers"] for r in neg)
    neg_runs = sum(r["runs"] for r in neg)
    tn = neg_runs - fp

    total = tp + tn + fp + fn
    precision = tp / (tp + fp) if (tp + fp) > 0 else 1.0
    recall = tp / (tp + fn) if (tp + fn) > 0 else 1.0
    accuracy = (tp + tn) / total if total > 0 else 0.0

    print(f"{label}: {tp+tn}/{total} correct, "
          f"precision={precision:.0%} recall={recall:.0%} "
          f"accuracy={accuracy:.0%}")
Assertion 评估指标
当评估 skill 的输出质量时,使用以下指标:
| 指标 | 说明 |
|---|---|
| Pass Rate | 通过的断言数 / 总断言数 |
| Passed | 通过的断言数量 |
| Failed | 失败的断言数量 |
| Total | 总断言数量 |
性能指标
| 指标 | 单位 | 说明 |
|---|---|---|
| Time Seconds | 秒 | 执行时间 |
| Tokens | 个 | Token 使用量 |
| Tool Calls | 次 | 工具调用次数 |
| Errors | 次 | 遇到的错误数 |
统计聚合
{
  "pass_rate": {
    "mean": 0.85,     // 平均通过率
    "stddev": 0.05,   // 标准差
    "min": 0.80,      // 最小值
    "max": 0.90       // 最大值
  }
}
Delta 计算
比较两个配置(with_skill vs without_skill)的差异:
{
  "delta": {
    "pass_rate": "+0.50",        // 通过率提升 50%
    "time_seconds": "+13.0",     // 时间增加 13 秒
    "tokens": "+1700"            // Token 增加 1700
  }
}
输入层(测试集)
-
Draft Skills: Skills草稿
-
evals.json 测试用例集(功能测试文件):评估 skill 的功能质量(输出是否正确、完整、有用)而非触发准确性
-
trigger_eval.json 触发评估集 (触发测试文件):评估 skill 描述的触发准确性(该触发时触发,不该触发时不触发)
测试集的构建:半自动生成, 结合 AI 生成 + 人工审查
evals.json: 位于
格式如下:
{
  "skill_name": "example-skill",
  "evals": [
    {
      "id": 1,
      "prompt": "用户任务的提示词,例如:'帮我填写这个 PDF 表单,路径在 ~/Downloads/application.pdf'",
      "expected_output": "期望输出的描述,例如:'成功填写 PDF 表单,生成新文件'",
      "files": [
        "evals/files/sample1.pdf",
        "evals/files/input_data.json"
      ],
      "expectations": [
        "输出包含正确的表单字段值",
        "使用了 fill_pdf.py 脚本",
        "生成的 PDF 文件存在且可读",
        "所有必填字段都已填写"
      ]
    },
    {
      "id": 2,
      "prompt": "另一个测试场景...",
      "expected_output": "...",
      "files": [],
      "expectations": ["..."]
    }
  ]
}
trigger_eval.json
CC会首先生成 20 个触发评估查询, 10个should_trigger=true 的查询(应该触发), 和10个should_trigger=false 的查询(不应触发)
而后生成一个交互式 HTML 界面(基于 assets/eval_review.html)供人工审查和编辑
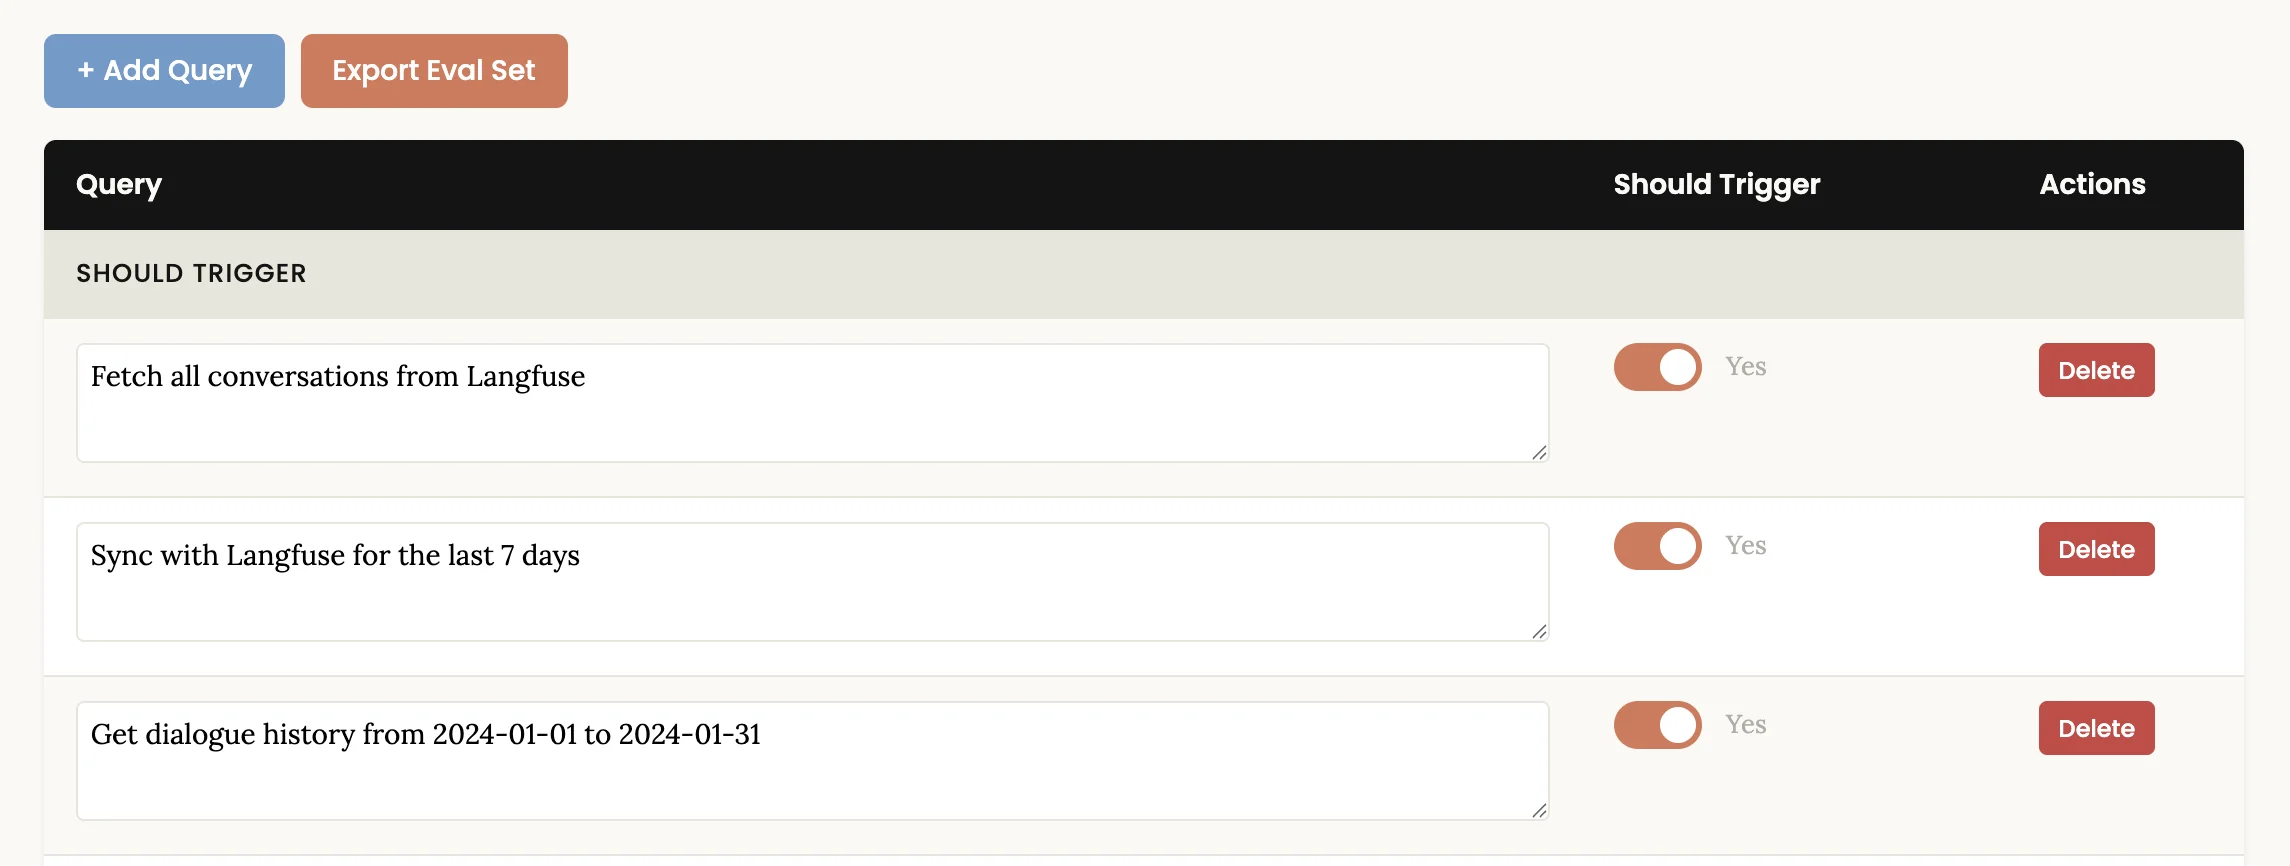
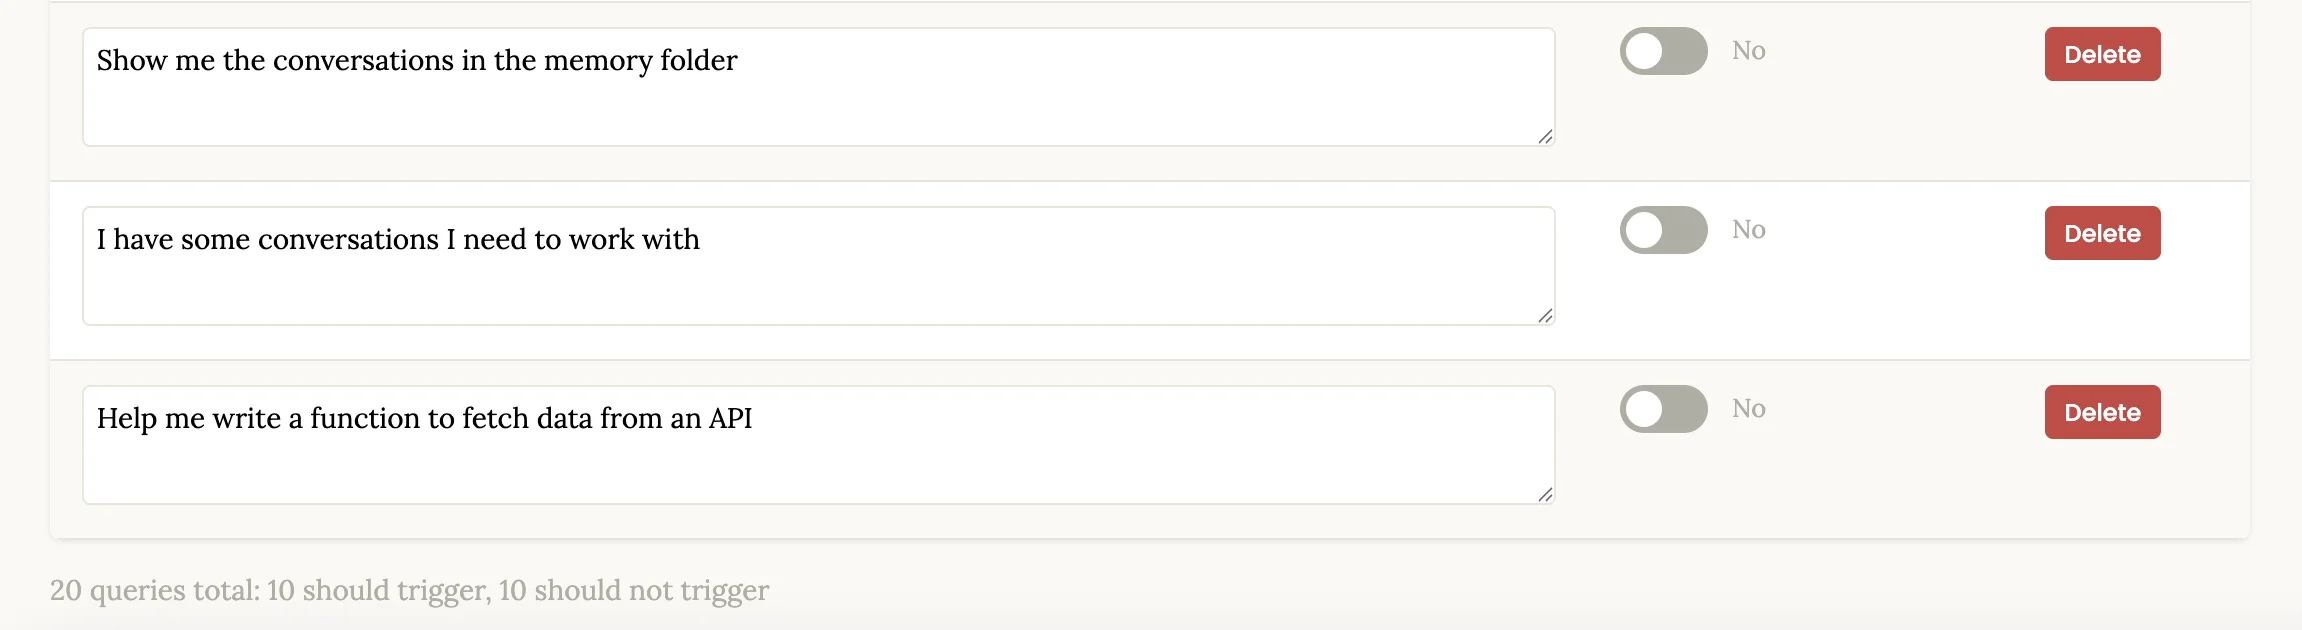
最终结果保存在: <skill-directory>/evals/trigger_evals.json
格式:
[
  {
    "query": "hey can you help me fill out this pdf form? its in ~/Downloads/application.pdf and i need to put my name as John Smith",
    "should_trigger": true
  },
  ...
  {
    "query": "merge these 3 word docs into a single pdf please",
    "should_trigger": false
  },
  ...
]
Subagent设计
整体而言,分为4种角色分工
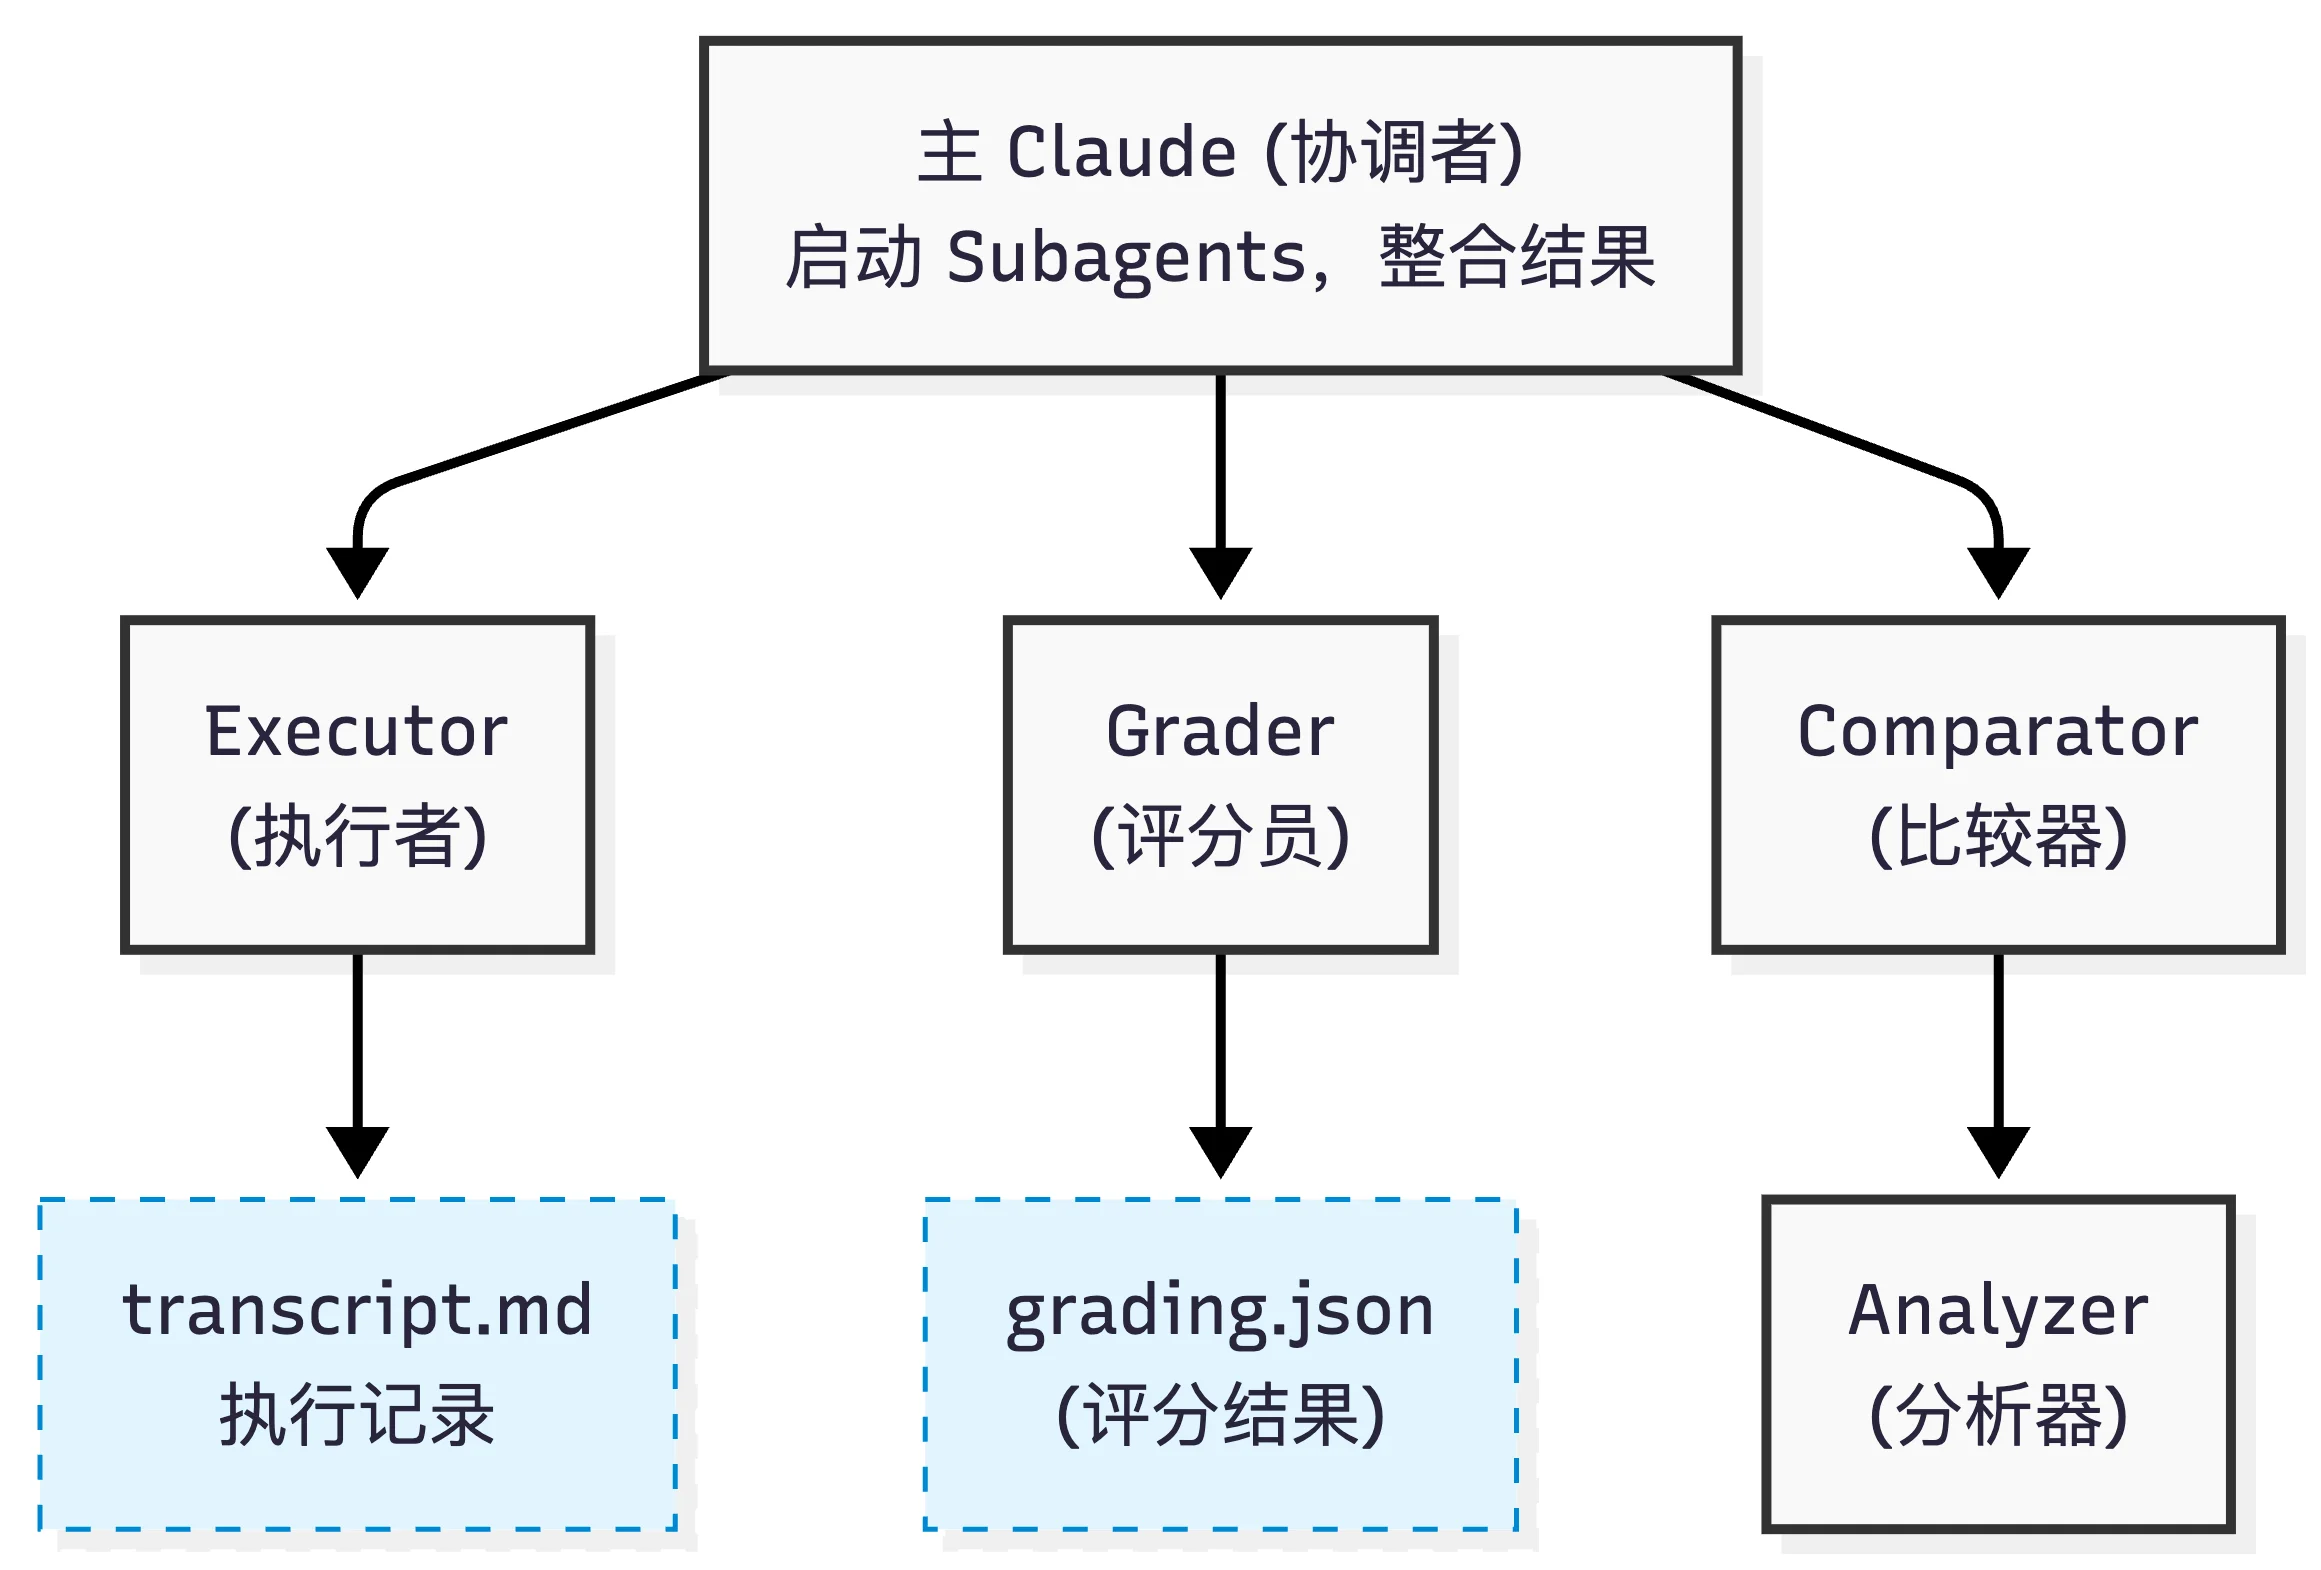
| Subagent | 职责 | 输入 | 输出 |
|---|---|---|---|
| Executor | 执行 | Skill + Prompt | 输出文件 + 执行记录 |
| Grader | 打分 | 输出 + 断言清单 | grading.json |
| Comparator | 盲测比较 | 输出A + 输出B | comparison.json (胜者) |
| Analyzer | 分析 | 比较结果 + Skills + 记录 | analysis.json |
Executor
Executor 是通过 CC 的 Agent tool 直接调用的subagent (即默认的general-purpose)
(from SKILL.md line 169)
Step 1: Spawn all runs (with-skill AND baseline) in the same turn
For each test case, spawn two subagents in the same turn — one with the skill, one without. This is important: don’t spawn the with-skill runs first and then come back for baselines later. Launch everything at once so it all finishes around the same time.
With-skill run:
Execute this task:
- Skill path: <path-to-skill>
- Task: <eval prompt>
- Input files: <eval files if any, or "none">
- Save outputs to: <workspace>/iteration-<N>/eval-<ID>/with_skill/outputs/
- Outputs to save: <what the user cares about — e.g., "the .docx file", "the final CSV">
Baseline run (same prompt, but the baseline depends on context):
Creating a new skill: no skill at all. Same prompt, no skill path, save to
without_skill/outputs/.Improving an existing skill: the old version. Before editing, snapshot the skill (
cp -r <skill-path> <workspace>/skill-snapshot/), then point the baseline subagent at the snapshot. Save toold_skill/outputs/.Write an
eval_metadata.jsonfor each test case (assertions can be empty for now). Give each eval a descriptive name based on what it’s testing — not just “eval-0”. Use this name for the directory too. If this iteration uses new or modified eval prompts, create these files for each new eval directory — don’t assume they carry over from previous iterations.{ "eval_id": 0, "eval_name": "descriptive-name-here", "prompt": "The user's task prompt", "assertions": [] }
“spawn subagent” = 使用 Claude Code 的 Agent tool 启动子代理
Executor 是直接被调用的通用子代理, 同一回合内的对照实验
-
With-skill run:加载新 Skill,执行任务
-
Baseline run: 不带任何技能, 只凭 Claude 的基础能力执行同样的任务
结果,记录下一份 transcript.md——包含了模型执行了哪些步骤、调用了什么工具、输出了什么中间内容
Grader Agent
skill-creator/agents/grader.md
Evaluate expectations against an execution transcript and outputs.
独立审计 + 质量控制
核心任务在于评估技能执行结果是否满足预定义的expectations,通过审查执行transcript和输出文件,对每个期望进行 pass/fail 判断。此外同时支持:
-
提取并验证隐含声明(implicit claims)
-
评估自身的评估过程(meta-evaluation)
-
提供评估改进建议
工作流程
步骤 1:阅读执行记录 (Transcript):通读执行过程,了解执行者遇到了什么提示、采取了什么步骤以及最终结果。

步骤 2:检查输出文件 (Outputs):深入输出目录,不仅看执行记录怎么说,还要亲自(使用工具)检查文件的实际内容和质量。

步骤 3:评估各项预期 (Evaluate Assertions):逐一核对预设的期望条件,寻找确凿证据来判定是 PASS(通过)还是 FAIL(失败),并拒绝仅停留在表面的“伪合规”。

步骤 4:提取并验证声明 (Verify Claims):除了预设条件,它还会主动从执行记录和输出中提取事实、流程和质量相关的“隐性声明”,并验证其真伪,以抓住预设条件可能漏掉的问题。

步骤 5:阅读用户笔记 (User Notes):如果存在用户笔记,它会读取并提取执行者标记的不确定性或遇到的问题。

步骤 6:审视评估标准 (Critique the Evals):站在更高的维度,指出哪些“考题”太容易通过(例如只检查了文件名而没检查内容),或者哪些重要结果根本没有被考察到。

步骤 7 & 8:整合数据并输出:读取执行指标(如工具调用次数)和耗时数据,最后将所有结果写入一个结构化的 JSON 文件中
输入参数
expectations: 期望列表(从 evals.json 获取)
transcript_path: 执行transcript记录路径
outputs_dir: 输出文件目录
输出格式
生成 {outputs_dir}/../grading.json:
{
    "expectations": [
      {
        "text": "原始断言文本",
        "passed": true/false,
        "evidence": "支持判断的具体引用或描述"
      }
    ],
    "summary": {
      "passed": 2,
      "failed": 1,
      "total": 3,
      "pass_rate": 0.67
    },
    "claims": [...],
    "eval_feedback": {
      "suggestions": [...],
      "overall": "对评估设计的整体评价"
    }
  }
评分标准
**PASS when**:
- The transcript or outputs clearly demonstrate the expectation is true
- Specific evidence can be cited
- The evidence reflects genuine substance, not just surface compliance (e.g., a file exists AND contains correct content, not just the right filename)

**FAIL when**:
- No evidence found for the expectation
- Evidence contradicts the expectation
- The expectation cannot be verified from available information
- The evidence is superficial — the assertion is technically satisfied but the underlying task outcome is wrong or incomplete
- The output appears to meet the assertion by coincidence rather than by actually doing the work

**When uncertain**: The burden of proof to pass is on the expectation.
(Step 4: Extract and Verify Claims)
Beyond the predefined expectations, extract implicit claims from the outputs and verify them
即Hallucination 检查。
“隐性声明(implicit claims)”: 除了expectations 之外的检查项,Agent在执行时产生的statements(顺口吐露的陈述?)
由于这些 statements 不在 Rubric 里,传统测试会之间跳过。而Step4 Grader 会逐个检查agent的statements是否存在幻觉或者是撒谎的情况。
implicit claims被大致分成:
-
Factual claims: 事实层面;如agent claims “该表单包含 12 个字段”, 则Grader需要亲自去数
-
Process claims: 流程层面; 如 agent claims “使用了 pypdf 库来填写这个表单“, 则Grader需要检查日志或者代码,避免出现“假装自己调用了” 的情况
-
Quality claims: 质量层面; 当Agent 自信地claims“所有必填字段都已正确填写”, Grader必须检查一下是否属实。
(Step 6: Critique the Evals)
Good assertions test meaningful outcomes — assertions that are hard to satisfy without actually doing the work correctly.
好的测试用例(断言)应该考察那些有实质意义的结果。在评判完执行表现后,反过来评判测试用例本身的质量(只有在发现“明显的差距(clear gap)”时才提出建议)。
好的建议应该指向那些能测试meaningful outcomes的断言:确保测试具备“区分度”。
- An assertion that passed but would also pass for a clearly wrong output (e.g., checking filename existence but not file content)
- An important outcome you observed — good or bad — that no assertion covers at all
- An assertion that can't actually be verified from the available outputs
-
防止Anti-Shortcut: 标准太低agent容易只看重表面合规;
-
检查盲区:审查输出时,观察到了某个非常重要好的(或坏的)结果,但现有的所有断言都没有对这个结果进行考察
-
无足够信息判断真伪
简单来说,Grader Agent不是简单地打分,而是:Evaluate → Verify Claims → Critique Evals → 数据整合结构化输出(包括性能指标) 的流程。
Comparator Agent
盲测比较。
核心任务在于:盲比较两个输出,判断哪个更好 —— 不知道 A/B 分别来自哪个 skill,避免偏见
工作流程
读取输出 (Read Both Outputs):检查 A 和 B 的文件或目录,并注意其类型、结构和内容。

理解任务 (Understand the Task):仔细阅读 eval_prompt,明确任务要求生成的产物,以及区分好坏输出的关键质量指标(如准确性、完整性、格式等)。

生成评估矩阵 (Generate Evaluation Rubric):基于具体任务,动态生成“内容”和“结构”两个维度的评分标准。

依据矩阵评估 (Evaluate Each Output):针对 A 和 B,对矩阵中的每项标准进行 1-5 分的打分,并计算出 1-10 分制的总分。

检查断言 (Check Assertions):如果输入包含了 expectations,则分别针对 A 和 B 检查这些断言,计算通过率作为辅助证据。

确定获胜者 (Determine the Winner):按优先级决定胜者。首要依据是评估矩阵的总分,次要依据是断言通过率,如果两者真实水平完全相等才宣布平局。

写入结果 (Write Comparison Results):将比较结果保存为指定的 JSON 文件。
# comparator.md 输入参数
{
    "output_a_path": "...",      # 匿名输出 A
    "output_b_path": "...",      # 匿名输出 B
    "eval_prompt": "...",        # 原始任务
    "expectations": [...]        # 期望列表(可选)
}
评分 Rubric:
| 维度 | 1 (Poor) | 3 (Acceptable) | 5 (Excellent) |
|---|---|---|---|
| Content | |||
| Correctness | Major errors | Minor errors | Fully correct |
| Completeness | Missing key elements | Mostly complete | All elements present |
| Accuracy | Significant inaccuracies | Minor inaccuracies | Accurate throughout |
| Structure | |||
| Organization | Disorganized | Reasonably organized | Clear, logical |
| Formatting | Inconsistent/broken | Mostly consistent | Professional |
| Usability | Difficult to use | Usable with effort | Easy to use |
输出格式
生成 comparison.json:
{
  "winner": "A" | "B" | "TIE",
  "reasoning": "获胜原因说明",
  "rubric": {
    "content_criteria": {
      "correctness": {"a_score": 4, "b_score": 5, "notes": "..."},
      "completeness": {"a_score": 3, "b_score": 4, "notes": "..."},
      "accuracy": {"a_score": 5, "b_score": 4, "notes": "..."}
    },
    "structure_criteria": {
      "organization": {"a_score": 4, "b_score": 3, "notes": "..."},
      "formatting": {"a_score": 5, "b_score": 4, "notes": "..."},
      "usability": {"a_score": 4, "b_score": 5, "notes": "..."}
    }
  },
  "overall_scores": {
    "a_score": 8.2,
    "b_score": 8.5
  },
  "output_quality": {
    "a_strengths": ["优势1", "优势2"],
    "a_weaknesses": ["劣势1", "劣势2"],
    "b_strengths": ["优势1", "优势2"],
    "b_weaknesses": ["劣势1", "劣势2"]
  },
  "expectation_results": {
    "a_pass_rate": 0.8,
    "b_pass_rate": 0.9,
    "details": [...]
  }
}
设计哲学:
为了确保评判完全客观且基于输出质量本身,采用Blindness(双盲)的设计,确保Agent在评估时只能基于输出结果本身。
同时依靠评估Rubric,避免完全的主观评分。并将Overall rubric score(综合结果)作为首要的决策依据,而非单独Expectation scores,避免hacking情况发生。
### Step 6: Determine the Winner

Compare A and B based on (in priority order):

1. **Primary**: Overall rubric score (content + structure)
2. **Secondary**: Assertion pass rates (if applicable)
3. **Tiebreaker**: If truly equal, declare a TIE

Be decisive - ties should be rare. One output is usually better, even if marginally.
Analyzer Agent
针对skills迭代优化而设计的复盘agent,通过深入执行中的细节,找出成功失败的根本原因,并输出如何修改的建议。
主要分为两大核心任务:
-
盲测复盘 (Blind Comparison Analysis):在两个不同版本的Skills(Winner vs. Loser)决出胜负后,对它们进行“揭盲”分析。通过对比两者的指令、工具和执行记录,找出胜者的制胜关键,并为败者提供改进方案。
-
基准测试模式挖掘 (Benchmark Pattern Analysis):在批量基准测试后,挖掘汇总数据背后的规律和异常
对于盲测复盘模式
分析过程:
1. 读取 comparison.json(谁赢了)
2. Unblind:确定 A 和 B 分别是哪个技能
3. 读取两个技能定义文件
4. 读取两个执行成绩单
5. 对比分析:
   - 指令遵循度
   - 执行策略差异
   - 工具使用模式
6. 归因分析:赢家为什么赢?
7. 生成改进建议(优先级排序)
8. 输出 analysis.json
输出格式: 生成 analysis.json
{
  "comparison_summary": {
    "winner": "skill-v2",
    "loser": "skill-v1",
    "score_difference": 1.5,
    "key_differentiator": "更详细的指令"
  },
  "winner_strengths": [
    "明确的步骤分解",
    "更好的错误处理指导",
    "清晰的输出格式要求"
  ],
  "loser_weaknesses": [
    "指令过于抽象",
    "缺少具体例子",
    "未说明边界情况处理"
  ],
  "instruction_following": {
    "winner_score": 9,
    "loser_score": 6,
    "notes": "赢家更准确地遵循了技能定义"
  },
  "improvement_suggestions": [
    {
      "priority": "HIGH",
      "category": "指令清晰度",
      "suggestion": "添加步骤分解和具体示例",
      "expected_impact": "提高输出质量和一致性"
    },
    {
      "priority": "MEDIUM",
      "category": "错误处理",
      "suggestion": "明确说明边界情况处理策略",
      "expected_impact": "减少失败率"
    },
    {
      "priority": "LOW",
      "category": "格式化",
      "suggestion": "统一输出格式要求",
      "expected_impact": "改善可读性"
    }
  ],
  "transcript_insights": {
    "winner_patterns": ["使用了更多工具", "更系统的探索"],
    "loser_patterns": ["跳过了某些步骤", "过早结束"]
  }
}
对于Benchmark 模式
1. 读取 benchmark.json(聚合数据)
2. 分析每个期望的通过率和方差
3. 识别模式:
   - 稳定期望 vs 不稳定期望
   - 简单任务 vs 困难任务
4. 分析指标趋势(时间、token、工具)
5. 检测异常和离群值
6. 生成观察列表(基于数据的洞察)
7. 输出观察数组
benchmark.json 来源于aggregate_benchmark.py,通过脚本生成汇总报告。
在 Benchmark 分析中,更关注于方差和异常点。
评估与优化流程
Skill 评估分为两个独立的流程:
-
功能评估:测试 skill 的输出质量(使用 evals.json)
-
触发评估:测试 skill 描述的触发准确性(使用 trigger_eval.json)
功能评估和优化
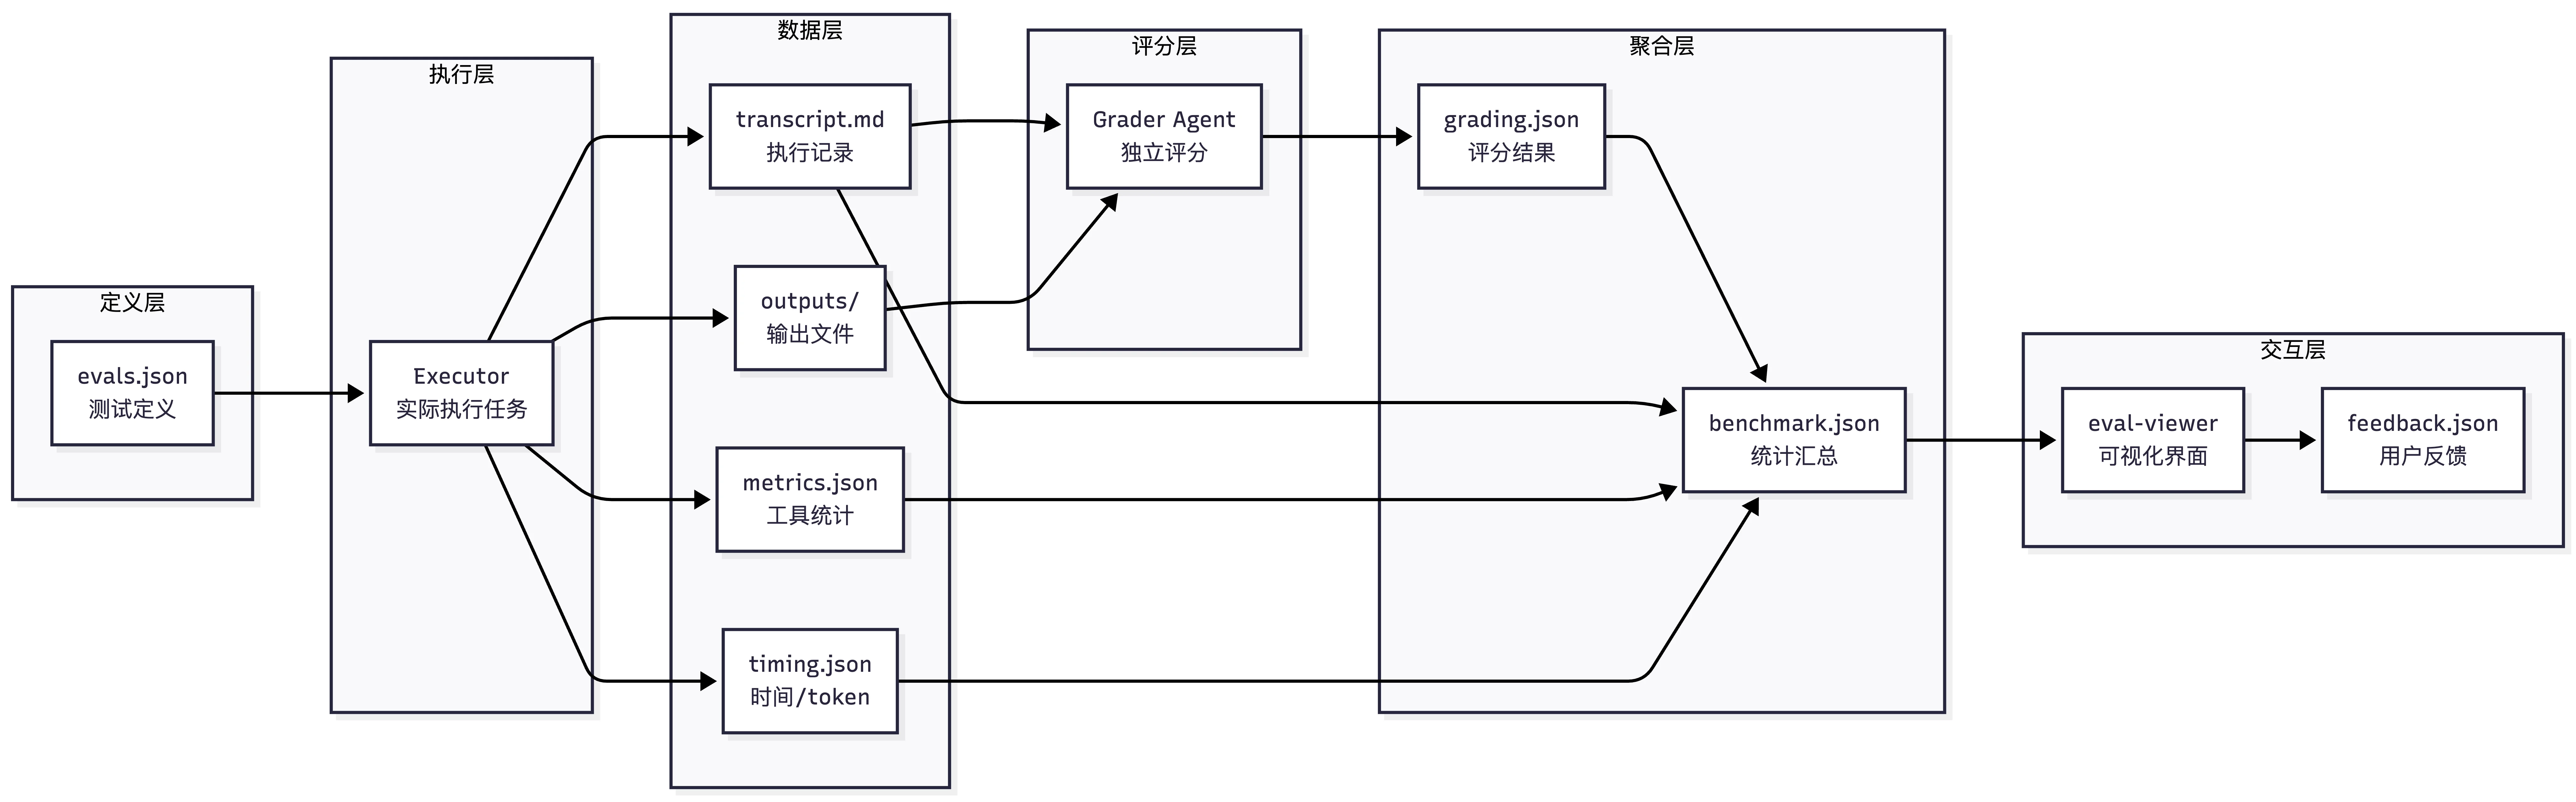
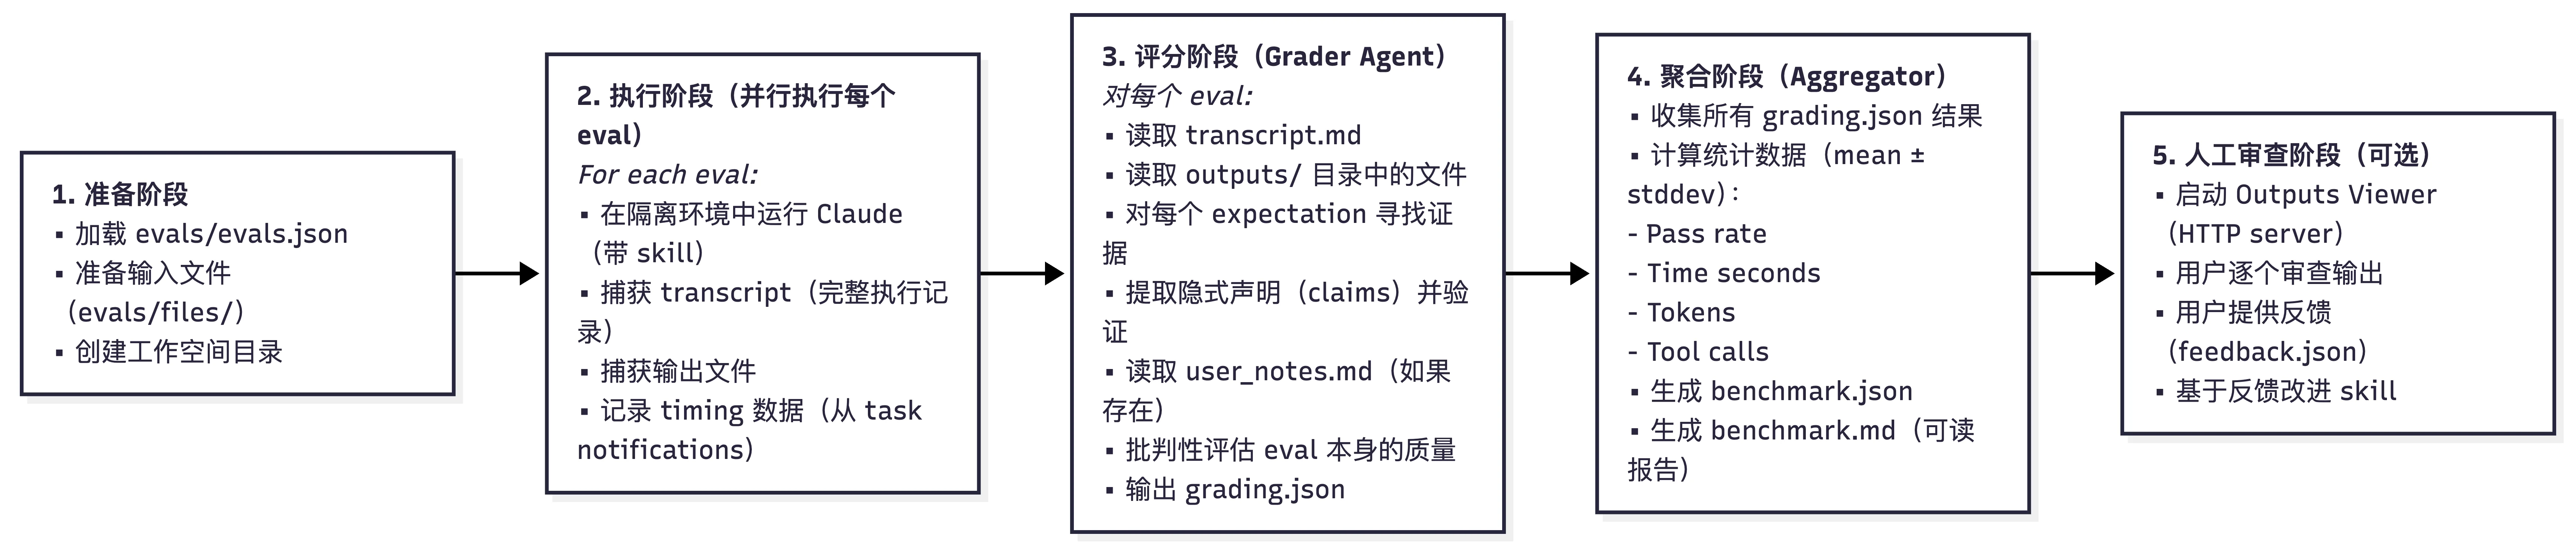
生成测试用例 → Executor →Grade → analyzer → (comparator) → Human-Review → 迭代 → …
对于功能优化而言,需要 CC + 用户协作(因为涉及理解任务、判断输出质量、决策如何改进)
触发评估和优化
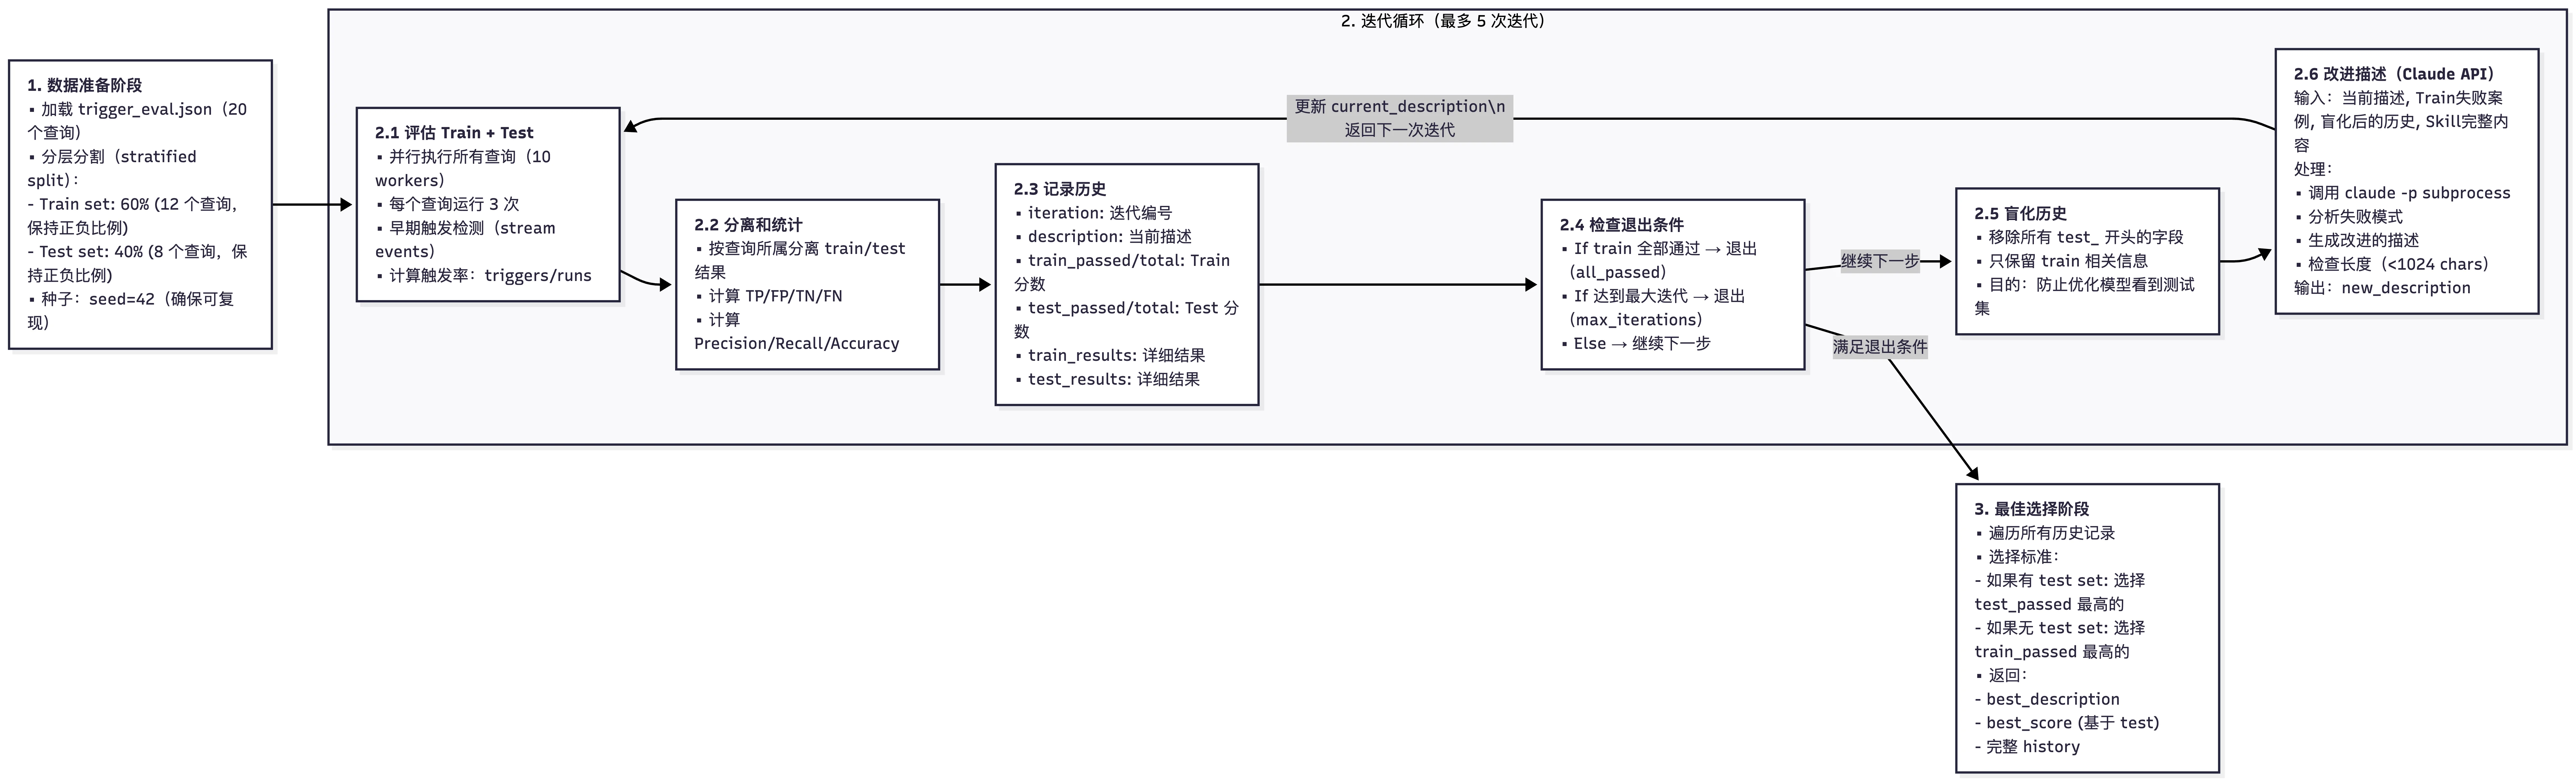
在后台运行 scripts.run_loop 脚本,将测试集划分为 60% 的训练集和 40% 的测试集,多次测试当前的描述(每个查询跑 3 次以获得稳定的触发率),并让 CC 根据失败的案例提出改进描述的建议。
最多会迭代 5 次。完成后,系统会生成一份 HTML 报告,并根据测试集的得分(为了防止过拟合)输出一个 best_description
相比之下,触发优化完全交给脚本自动跑(因为只是改一段描述文字,task单纯)。
几个核心脚本:
run_eval.py
触发评估;
-
使用
claude -p执行查询并监控 stream events -
通过
content_block_start事件早期检测触发 -
支持并行执行以提高效率
run_loop.py
将 eval 和 improve 串联成迭代循环,直到全部通过或达到最大迭代次数。
核心逻辑:
-
Train/Test 分割:支持 holdout 机制(默认 40%),防止过拟合
-
迭代执行:
-
运行 eval(train + test)
-
如果 train 全部通过 → 结束
-
否则,调用 improve_description 生成新 description
-
继续下一轮
-
-
防过拟合设计:向 improve 提供 history 时会隐藏 test 分数
-
最佳结果选择:根据 test 分数(或 train 分数)选择历史最佳 description
-
实时生成 HTML 报告,自动打开浏览器展示进度
improve_description.py
描述优化: 根据评估失败的案例,调用 Claude 生成改进后的 skill description
核心逻辑:
-
分析 eval 结果,分类出:
-
Failed triggers:应该触发但没触发
-
False triggers:不该触发但触发了
-
-
构建详细的 prompt,包含:
-
当前 description
-
失败案例分析
-
历史尝试记录(防止重复)
-
Skill 完整内容(供参考)
-
-
调用 claude -p 生成新的 description
-
如果生成超过 1024 字符限制,会自动重写
小结
回顾新版 skill-creator 的重构, 其代表了 Agent 开发模式从手动调优(Prompt Engineering)向评估驱动工程(Eval-Driven Engineering)的范式转变 (或者也可以叫做Harness-Engineering)。
几个具借鉴意义的设计理念:
物理隔离确保客观性:通过 Subagent 机制严格隔离上下文,避免了主 Agent 与 Subagent 之间、不同测试用例之间的 Context 污染,保证了评估的绝对公平
不只是LLM-as-a-judge:Grader 不仅只是核对Rubric打分,还会主动提取隐性声明(Implicit Claims)做事实核查。它甚至会反向审视测试用例本身的合理性(Critique Evals),有效防止了 Agent hacking。
双盲去偏见:A/B 双盲比较确保评判基于输出质量本身。
非单一指标: 不仅关注最终的成功率,还将方差、异常值、Token 消耗等性能指标纳入考量。
不可否认,目前的自动化仍有边界。当前系统仅能实现 Skill 描述的自动迭代。由于功能逻辑的复杂性,Skill Body 的指令与代码优化依然高度依赖人机协作(Human-in-the-loop)。完全依靠一次交互实现 100% 的能力进阶仍不现实。
但也至少指明了方向。
参考
claude-blog: improving-skill-creator-test-measure-and-refine-agent-skills